

If your WordPress site’s emails keep ending up in spam folders, or failing to send altogether, the default WordPress setup is very often to blame. By default, WordPress uses basic PHP scripts from your hosting server. These lack proper sender validation and trigger security red flags.
Routing your website notifications through GoDaddy Email using FluentSMTP can be a great way to resolve or mitigate these problems. It has helped us increase deliverability for our clients, and we hope that the same will be true for you and your business or clients. GoDaddy sells two distinct email services: Microsoft 365 through GoDaddy and legacy Workspace/Professional Email. This guide breaks down how to configure either option cleanly inside WordPress.
Why Route GoDaddy Mail Through FluentSMTP?
- Better Delivery Rates: Your transactional messages are sent directly through GoDaddy’s authenticated mail servers.
- Free to Use: FluentSMTP provides native integrations for custom API setups and standard SMTP credentials without charging fees or locking features behind paywalls.
- Failure Logging: Keep track of every form submission, account notification, or receipt sent from your site, complete with detailed logs if an email ever bounces.
Pre-Step: Determine Your GoDaddy Email Type
GoDaddy offers two main email services:
- Microsoft 365 from GoDaddy: Modern accounts managed through GoDaddy’s Email & Office Dashboard.
- GoDaddy Professional / Workspace Email: Legacy webmail using GoDaddy’s standard outgoing servers.
Check your GoDaddy account dashboard to confirm which type you have, then follow the matching steps below.
Step 1: Install FluentSMTP
- Log in to your WordPress Dashboard.
- Go to Plugins > Add New.
- Search for FluentSMTP.
- Click Install Now, then Activate.
- Navigate to Settings > FluentSMTP to start setup.

Method A: GoDaddy Microsoft 365 Accounts
If GoDaddy manages your email through Microsoft 365, the simplest approach uses direct OAuth 2.0 or SMTP authentication.
1. Enable SMTP Authentication in GoDaddy
Microsoft disables standard SMTP sending by default for security, so you need to toggle it on first:
- Log in to your GoDaddy Email & Office Dashboard.
- Click Manage next to the user account sending site mail.
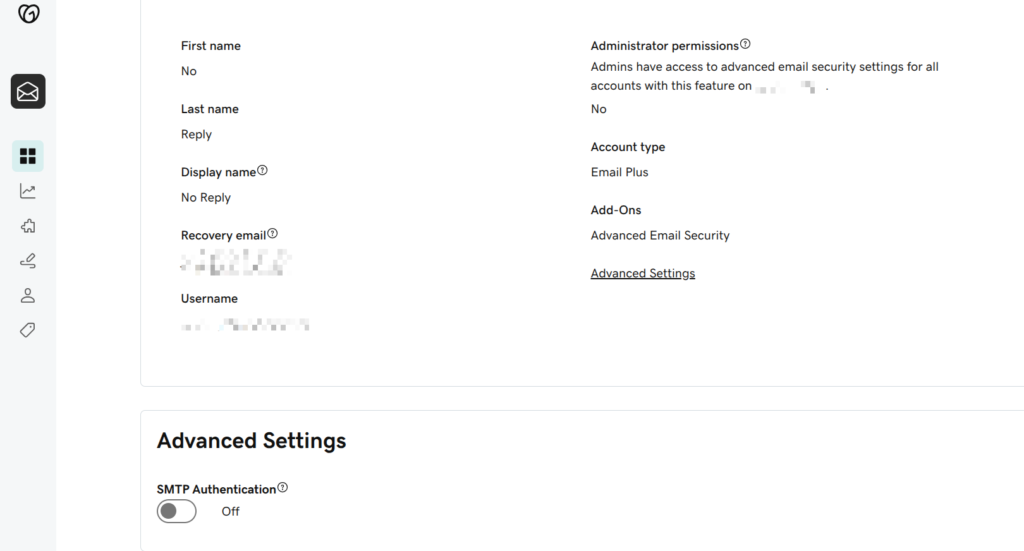
- Scroll down to Advanced Settings.
- Switch SMTP Authentication to ON and confirm.
2. Configure FluentSMTP
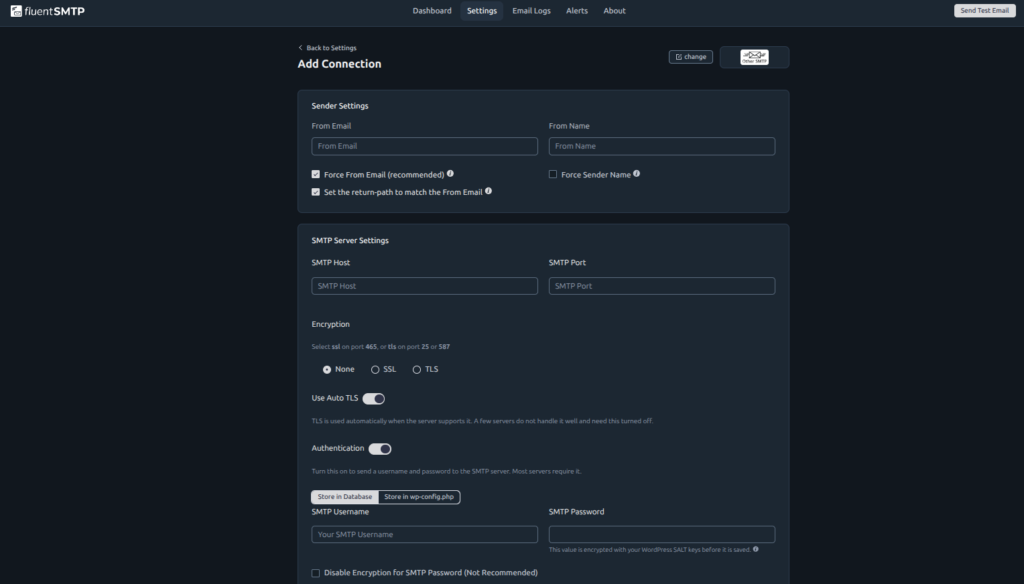
- In WordPress, open FluentSMTP > Settings and click Add New Connection.
- Select Outlook / Office 365 (for OAuth API connection) or Other SMTP. If you choose OAuth, click here to skip ahead to the OAuth instructions.
- If using Other SMTP, enter the following credentials:
- SMTP Host: smtp.office365.com
- Port: 587
- Encryption: TLS / STARTTLS
- Authentication: ON
- Username: Your full GoDaddy email address
- Password: Your GoDaddy email password
- Save your settings.
Method B: GoDaddy Legacy / Professional Email Accounts
Step 1: Set up
If you use GoDaddy’s standard webmail platform rather than Microsoft 365, use these direct server settings instead:
- Open FluentSMTP > Settings and click Add New Connection.
- Select Other SMTP.
- Enter the GoDaddy server details:
- From Email: Your full GoDaddy email address
- From Name: The display name for site messages (e.g., Site Admin)
- SMTP Host: smtpout.secureserver.net
- Port: 465 (for SSL) or 587 (for TLS)
- Encryption: SSL/TLS (for port 465) or STARTTLS (for port 587)
- Authentication: ON
- Username: Your full GoDaddy email address
- Password: Your GoDaddy email account password
- Click Save Connection Settings.
Step 2: Send a Test Email
- In WordPress, head to FluentSMTP > Email Test.
- Enter a personal inbox address into the Send To box.
- Click Send Test Email.
- Check your inbox. The test email should arrive in your main inbox within a few moments.
Set up with oAuth
Step 1: Start Setup in FluentSMTP
- Open your WordPress dashboard and go to Settings > FluentSMTP.
- Click Add New Connection and select Outlook / Office 365.
- Enter your From Email (your GoDaddy Microsoft 365 email address) and From Name.
- Look for the field labeled App Callback URL (or Redirect URI).
- Copy this URL string. You will need to paste it into Microsoft Azure in the next step.
- Keep this WordPress tab open.
Step 2: Register the App in Microsoft Azure (Entra ID)

- Open a new browser tab and log into the Microsoft Entra Admin Center using your Microsoft 365 admin account.
- In the left navigation sidebar, go to Applications > App registrations.
- Click + New registration at the top.
- Fill in the app details:
- Name: Enter FluentSMTP WordPress or a similar name.
- Supported account types: Select Accounts in any organizational directory and personal Microsoft accounts (Multitenant).
- Redirect URI: Select Web from the platform dropdown menu.
- Redirect URI Value: Paste the App Callback URL you copied from FluentSMTP in Step 1.
- Click Register.

Step 3: Get Your Client ID
- After registering, you will be taken to the app Overview page.
- Locate the Application (client) ID string.
- Copy this ID, switch back to your WordPress tab, and paste it into the Application Client ID field in FluentSMTP.
Step 4: Create a Client Secret
- Back in the Azure portal sidebar under your app registration, click Certificates & secrets.
- Select the Client secrets tab and click + New client secret.
- Add a description (e.g., FluentSMTP Key) and set an expiration timeframe (e.g., 12 or 24 months). Now would be a great time to set a calendar reminder for yourself to ensure you remember the date the key will expire.
- Click Add.
- Copy the Value right away: Look under the Value column (not Secret ID) and copy the string. Microsoft hides this value permanently once you refresh or leave the page.
- Switch back to WordPress and paste it into the Application Client Secret field in FluentSMTP.

Step 5: Authorize and Get Your Access Token

- In FluentSMTP, click the button labeled Authenticate with Office365 & Get Access Token.
- A Microsoft login pop-up window will appear. Sign in using your GoDaddy Microsoft 365 email account.
- Review the requested permissions (sending mail on your behalf) and click Accept.
- You will be redirected to a page displaying a long string of text labeled Your Access Code.
- Copy the entire access code string, switch back to FluentSMTP, and paste it into the Access Token text box.
- Click Save Connection Settings.
Step 6: Test the OAuth Connection
- In WordPress, go to FluentSMTP > Email Test.
- Enter a personal email address in the Send To field.
- Click Send Test Email.
- You should receive a green success notification in WordPress, and the email should hit your inbox instantly without using passwords or standard SMTP ports.

Common GoDaddy SMTP Pitfalls
- Daily Sending Limits: Standard GoDaddy email plans limit outbound SMTP relays, often capped at around 250 to 500 emails per day. If you run a large newsletter or high-volume store, consider a dedicated transactional provider like SendGrid or Amazon SES.
- Port Blocking: Some shared web hosts block outbound connections on Port 25. Stick to Port 587 or Port 465 when entering server details.
- SPF Verification: Ensure your domain DNS records include GoDaddy in your SPF string so receiving servers do not reject the connection (v=spf1 include:secureserver.net -all for legacy or include:spf.protection.outlook.com for Microsoft 365).
Still struggling to set up Fluent SMTP?
If you still need help setting up your email on your WordPress site, Contact SEC Marketing group.